Zerotier Router Setup Help
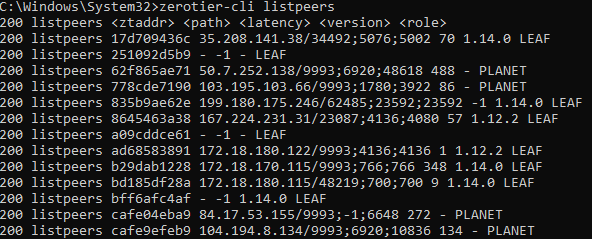
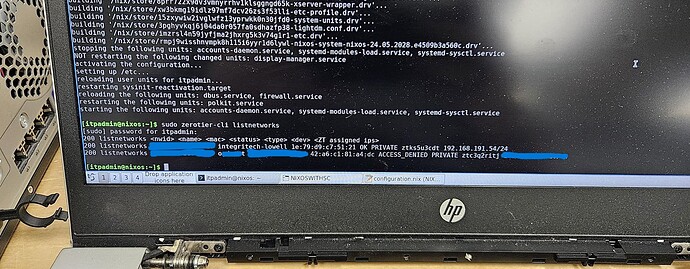
Im working on a zerotier router setup for the company I work for using nixos to help manager all of the routers of a particular client and keep tools consistent between all the devices. I’ve successfully got my laptop to talk to my zerotier router but my laptop cant talk to any devices parallel to the router. My assumption is that It was not forwarding the ip packets to other devices on the network so I was trying to look into ip forwarding and didn’t find much that worked for me or that was helpful (below are the resources I’ve looked at that may be relevant incase I misunderstood) can anyone help me figure out how to do ip forwarding on nixos or if this is even the issue or if is another network issue?
I talked with nixos unofficial support and they believe that the device is configured appropriately but had very little knowlage about Zerotier and was doing their troubleshooting based on wiregaurd they kept thinking it was an issue with nat on the isp router/mobile network
TLDR: Trying to create a zerotier endpoint/router but traffic is not moving across network that router is on. Need help figuring out ip forwarding i think. Thanks!
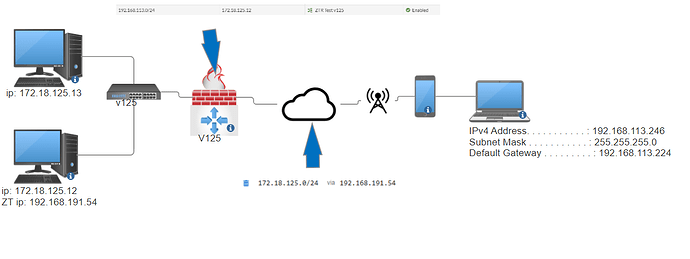
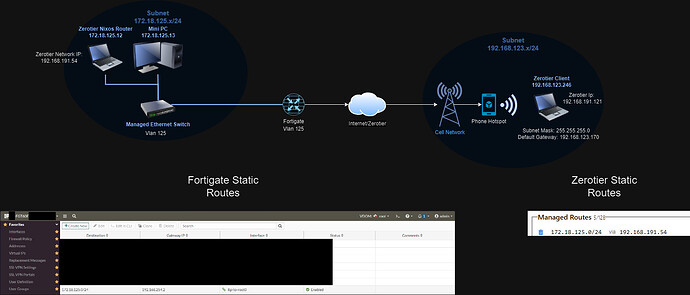
this is how i believe the network is laid out:
Config for Reference with work stuff censored (probably not relevant to you all but thought id include it):
# Edit this configuration file to define what should be installed on
# your system. Help is available in the configuration.nix(5) man page, on
# https://search.nixos.org/options and in the NixOS manual (`nixos-help`).

{ config, lib, pkgs, ... }:

#This is a test of the sync system x2 electricboogalo#

{

  imports =
    [ # Include the results of the hardware scan.
      ./disk-config.nix
	  "${builtins.fetchTarball "https://github.com/nix-community/disko/archive/master.tar.gz"}/module.nix"
      ./hardware-configuration.nix
    ];

  # Use the systemd-boot EFI boot loader.
  boot.loader.systemd-boot.enable = true;
  boot.loader.efi.canTouchEfiVariables = true;

  networking.hostName = "nixos"; # Define your hostname.
  # networking.wireless.enable = true;  # Enables wireless support via wpa_supplicant.

  # Configure network proxy if necessary
  # networking.proxy.default = "http://user:password@proxy:port/";
  # networking.proxy.noProxy = "127.0.0.1,localhost,internal.domain";

  # Enable networking
  networking.networkmanager.enable = true;
  networking.usePredictableInterfaceNames = true;

  # Enable network manager applet
  programs.nm-applet.enable = true;

  # Set your time zone.
  time.timeZone = "America/Chicago";

  # Select internationalisation properties.
  i18n.defaultLocale = "en_US.UTF-8";

  i18n.extraLocaleSettings = {
    LC_ADDRESS = "en_US.UTF-8";
    LC_IDENTIFICATION = "en_US.UTF-8";
    LC_MEASUREMENT = "en_US.UTF-8";
    LC_MONETARY = "en_US.UTF-8";
    LC_NAME = "en_US.UTF-8";
    LC_NUMERIC = "en_US.UTF-8";
    LC_PAPER = "en_US.UTF-8";
    LC_TELEPHONE = "en_US.UTF-8";
    LC_TIME = "en_US.UTF-8";
  };

  # Enable the X11 windowing system.
  services.xserver.enable = true;

  # Enable the LXQT Desktop Environment.
  services.xserver.displayManager.lightdm.enable = true;
  services.xserver.desktopManager.lxqt.enable = true;

  # Configure keymap in X11
  services.xserver = {
    layout = "us";
    xkbVariant = "";
  };

  # Enable sound with pipewire.
  sound.enable = true;
  hardware.pulseaudio.enable = false;
  security.rtkit.enable = true;
  services.pipewire = {
    enable = true;
    alsa.enable = true;
    alsa.support32Bit = true;
    pulse.enable = true;
    # If you want to use JACK applications, uncomment this
    #jack.enable = true;

    # use the example session manager (no others are packaged yet so this is enabled by default,
    # no need to redefine it in your config for now)
    #media-session.enable = true;
  };

  # Enable touchpad support (enabled default in most desktopManager).
  # services.xserver.libinput.enable = true;

  # Define a user account. Don't forget to set a password with ‘passwd’.
  users.users.itpadmin = {
    isNormalUser = true;
    description = "itpadmin";
    extraGroups = [ "networkmanager" "wheel" ];
    initialHashedPassword = "censored";
    packages = with pkgs; [
    #  thunderbird
    ];
  };

  # Install firefox.
  programs.firefox.enable = true;

  # Allow unfree packages
  nixpkgs.config.allowUnfree = true;

  # List packages installed in system profile. To search, run:
  # $ nix search wget
  environment.systemPackages = with pkgs; [
     vim
  #  wget
     gedit
     iperf
     nettools
     corosync
     tmux
     nmap
     termshark
     zerotierone
     nixos-generators
     parted
     gptfdisk
     disko
     git
     traceroute
  ];

  #Enable zerotier
    services.zerotierone = {
    enable = true;
    joinNetworks = ["censored"];
    port = 9993;
  };

  #Enable iptable forwarding
  boot.kernel.sysctl."net.ipv4.ip_forward" = 1;


  # Some programs need SUID wrappers, can be configured further or are
  # started in user sessions.
  # programs.mtr.enable = true;
  # programs.gnupg.agent = {
  #   enable = true;
  #   enableSSHSupport = true;
  # };

  # List services that you want to enable:

  # Enable the OpenSSH daemon.
  services.openssh.enable = true;

  # Open ports in the firewall.
  # networking.firewall.allowedTCPPorts = [ ... ];
  # networking.firewall.allowedUDPPorts = [ ... ];
  # Or disable the firewall altogether.
  # networking.firewall.enable = false;

  # Copy the NixOS configuration file and link it from the resulting system
  # (/run/current-system/configuration.nix). This is useful in case you
  # accidentally delete configuration.nix.
  system.copySystemConfiguration = true;

  # This option defines the first version of NixOS you have installed on this particular machine,
  # and is used to maintain compatibility with application data (e.g. databases) created on older NixOS versions.
  #
  # Most users should NEVER change this value after the initial install, for any reason,
  # even if you've upgraded your system to a new NixOS release.
  #
  # This value does NOT affect the Nixpkgs version your packages and OS are pulled from,
  # so changing it will NOT upgrade your system.
  #
  # This value being lower than the current NixOS release does NOT mean your system is
  # out of date, out of support, or vulnerable.
  #
  # Do NOT change this value unless you have manually inspected all the changes it would make to your configuration,
  # and migrated your data accordingly.
  #
  # For more information, see `man configuration.nix` or https://nixos.org/manual/nixos/stable/options#opt-system.stateVersion .
  system.stateVersion = "23.11"; # Did you read the comment?

}
Relevant Research that I’ve already done:
Though Wire guard setup might be similar: WireGuard - NixOS Wiki
also at the nixos options search website
Nixos Zerotier wiki is also very empty: ZeroTier One - NixOS Wiki
